Showing posts with label Pinterest. Show all posts

Monday, July 20, 2015

DIY Dining Table

I know I haven't been around lately. I am really behind on my blogging and blog reading. DIY projects have consumed me. I've crocheted some, but not a lot. I do have a couple completed projects, but I can't share just yet. Today I'm sharing a DIY project that Michael, Ireland and I finished on Saturday.

A dining table


We have a large empty space in the living area and I thought a table would be perfect.


I found something I liked on Pinterest and went from there. Michael works with a guy that has a saw mill, so we got the wood from him. Thursday, Michael came home with several 7' long pine boards that are about 7-8" wide.


About a week ago I ordered raw steel hairpin legs from hairpinlegs.com and Michael went to Lowes and bought several 2x4s, sandpaper and #10 size screws. 

Friday morning Michael built the frame using the 2x4s and I went to Lowes to get clear coat for the legs. I scrubbed the raw steel legs and sprayed them with a matte clear coat to protect them from rusting. While I worked on the legs, Michael placed the top boards upside down and screwed the frame to the boards. About 10pm we started sanding and by 11pm we were ready to put a coat of Minwax Spar Poly on the table top. I didn't get regular Minwax Poly because Spar Poly is better for use with dining tables to prevent water rings and food from staining the wood. Basically it seals better and is durable. The regular poly is for furniture like end tables, coffee tables, etc.


We finished the first coat of poly by midnight. That's why my photos are so bad.


Saturday morning we flipped the top over and screwed the legs on... and voila!


It's no where near perfect, but that's why I like it so much.  I love these legs (and really anything mid century modern).

Finished measurements:
78" in length
36" in width
2.5" thickness or depth

Materials:
Wood for the top (we used five 7-8" boards)
2x4s for the frame
#10 screws (2" in length since our top with frame measured 2.5")
sandpaper
four 28" hairpin legs (3 prong) 28" is standard table height
MinWax Spar Poly
Matte clear coat interior/exterior (to coat legs)

Tools used:
green scrubbing pads (to scrub the legs)
sander
sandpaper (various grit)
saw (we used Miter saw)
Drill
and a tape measure of course

We still need to sand and put one more coat of poly on the top. We are planning on buying three Eames chairs for one side of the table and making a bench with hairpin legs for the other side.

I'm hoping my next post will be about a crochet project that I haven't been able to share yet. Today I'll ask permission and see how long I need to wait. I'm sooo excited to share it with you, but I just have to be patient.

Have a great week!

Saturday, May 24, 2014

I'm Tired

I haven't felt like blogging or crocheting/ knitting much lately. With being super swamped at work, keeping up the housework and Ireland finishing the school year... I'm just tired. That's all I know to say. I managed to finish one of the online socks and started the second


I found this berroco sox on eBay for another pair


I also booked a trip to Disney and a Disney cruise. So, thanks to Pinterest, I made this countdown project


She's so excited. I am too. Ahhhh Florida (my favorite state), I can't wait.

The baby chicks are no longer babies


Hopefully I'll become more motivated in the near future. I think what I need is a vacation, but I have six months to wait for that. Sorry for such a depressing post. I don't have the energy to act happy and energetic. I think I just get overwhelmed with all the chores and work that I'm responsible for. My job is mentally tiring. I love it, but sometimes it can be overwhelming. I'm the only social worker in the facility with over 160 residents/ patients on my caseload. Outside of work the stinkin housework never ends. The car stays filthy. The weeds never stop growing. And now I have six chickens to take care of thanks to Ireland and Michael. Of course they promised me that they would take care of them...yeah right. That was before Michael started working from dawn to dusk six days a week. (Added to the three outside cats, 1 inside dog, betta fish, and hermit crab). I think I have decided to hire someone to come and help me with the cleaning once or twice a month. I just might deserve that trip to Disney. 

So now that I have moaned and whined and totally depressed you about things you probably know all about....
Have a peaceful week✌️

Monday, May 27, 2013

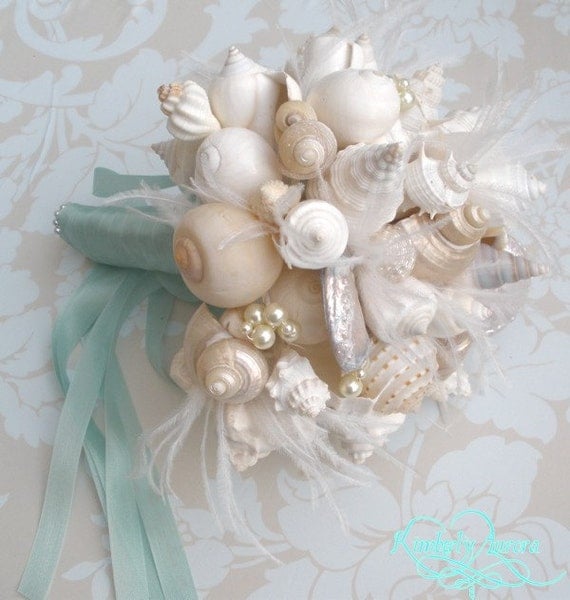
Sea Shell Project

My current project is going to be a fun one. I am making a wedding bouquet for myself. 


Michael and I have decided to finally get married. Most people assume that we are already married, but we are not. We have been together for 6 years, and just now have decided to start making plans. I have been married once before, and I knew this time I wanted to do things differently...so my bouquet is not going to be a traditional one.


We are going to the Outer Banks (Hatteras Island) in September to do the deed...hahaha. The ceremony will be right on the beach of course. Only a couple of family members will be present... so I'm thinking almost an elopement.

The shells up top are mostly the ones we found from previous vacations in the Outer Banks...Ocracoke and Hatteras...so I really wanted to use those in the bouquet.


My favorite color is turquoise, so of course I'm using it in the wedding. (Speaking of turquoise, I am searching for a white to turquoise ombre dress, but have had no luck.) The bouquet will include turquoise sea stars and beads. 

I'm really looking forward to this project. 

Speaking of turquoise, I think I'll crochet a small bridal wrap or shawl. I don't want to wear all white.

 Inspiration for the bouquet...


and this one...but I will add the color of course


and this one...they are all so beautiful and different


All of these images were found through Pinterest, pinned to my beach wedding board. I think I linked back to original source. 

I really hope I can figure this project out, because I have my heart set on mine looking similar to any of the ones in the inspiration photos. 

I'll keep you updated.

Sorry no crochet, but I will post soon about something hook related.

Have a great week!

Saturday, May 4, 2013

Pegboard Progress

I've made some progress with my yarn storage...I'm about halfway there


The scraps...I can see granny squares in my future


maybe this will motivate me to get busy on the patchwork again.

The cool, cloudy weather here this weekend has put me in the crocheting mood. I think I'll go make a few squares.

Have a great weekend.

Wednesday, April 17, 2013

Unpacking My Yarn...At Last

I've put off unpacking my yarn until I found some neat storage ideas on Pinterest.


Above is a small start. I still have 5 more boxes to go through and ball or wind up. I love the idea found at Knitsforlife.


My little winder is there in the middle of the mess. It will take me awhile to wind all of the yarn to go on the pegboard. I chose not to paint the pegboard.


Sorry to be so boring with all of these projects. I've not been too creative lately, but at least I'm being inspired by the creativity of others.

Saturday, April 6, 2013

Concrete Planters

Last weekend I made some concrete planters. Yes...this was another Pinterest project. I'm a little addicted;)


The first batch was for these small ones. I used plastic bowls for the round/ oval ones and a Soy Milk carton for the square one.


I'm using these for succulents. I planted cactus seeds in the middle and square one earlier today. Now I'm motivated to make the big ones I really want. I hate spending $30 plus for a large planter so I'm going to try to make a couple of great big ones with the concrete.

I spent the rest of today working outside. I have to show you the rosemary that I need help with.


I researched online that I should prune it in the winter...well it's too late now, so I'm wondering if it will hurt it to prune and take cuttings now. I've never had rosemary this ginormous before.

To follow up on a previous project...the window boxes are done. You can see them in the photo. I just need to figure out what to plant in them.

I've also been working on the play room. It still looks bad...but better.


This photo doesn't show the whole room...I have to figure out how to cover the ugly HVAC in the corner. Any ideas?

For my next post I'll try to show you something related to crochet. I still haven't unpacked my yarn. I know...shame on me.

I'm itching to crochet something, maybe I should search Pinterest...hehe.
I'm thinking about something in jute for the house. Hmmm


Sunday, March 17, 2013

A Little Crochet and More Pinterest Projects

The past two weekends were so nice. The weather was perfect for getting outside. Spring is almost here:)


I re-potted several plants including this monster aloe. All of these came from one plant (the one in the back)
I mentioned that I would like to build two window boxes and Michael ran with the idea. He started off strong by going to Lowes and getting lumber, Kilz primer, and paint.


This is how the boxes look now...hahaha


Work always seems to get in the way.

I decided to put Pinterest to good use again. 


I bought a couple of bags of small stones from Dollar General, (only used a small amount)
E 6000 from Hobby Lobby, 
and glued them onto a rubber placemat found at IKEA (cut into two smaller circles)


I originally had a trivet in mind for this project, but it looks interesting as a centerpiece


I haven't really crocheted much. I did make two squares for the patchwork. I've been wanting to post about a pair of fingerless mitts I made a few weeks ago. I know it's practically spring so I'm not sure if I'll post that pattern or not. Let me know what you think;)

 Oh, I almost forgot...I also tried a Pinterest recipe. I made crock pot chicken and dumplings and they were yummy.

For now, I think I'll finally try to get caught up with my blog reading.

I hope everyone has a peaceful upcoming week.

Saturday, December 29, 2012

The Jewelry Display...At Last

The jewelry display is pretty much done...


I need to add more eyelet hooks so I can finish adding earrings. This tray is not large enough for all of my jewelry, so I guess I'll have to find another tray and make another display to go with this one. 


I added the hooks to the sides for necklaces...I just need to add a few more (and the necklaces). I was too impatient to do that before this post;)


I'm not sure if I want to add hooks to the bottom. I think I'll just save that for the next display.


Here's how I made this thing

It began like this...


Michael sprayed a coat of primer, then used this paint... two cans


between coats


 I then added the hooks and eyelet hooks found at Lowes. To get the hole started, I used a sharp extra pointy knife, then just used my fingers to screw them in. It will make your fingers so sore, so I had to do a few each day for several days.


I'm soooo glad it's done. I'll think I'll go antique-ing next week to find another tray:)
Hope you all have a great weekend

Sunday, December 2, 2012

Tuesday Tallies...Early

I just can't seem to make it home early enough on Tuesdays to take photos of my One a Day project. So I've decided to take my photos on the weekend.


I've completed 5 rows. 10 squares for each row makes 50 squares. Check out Gingerbread Girl to see other One A Day projects.


I've started another project....uuugggh. I'm terrible. I get so bored with doing the same thing


I am chevron crazy right now. I can't get enough of them


This chevron pattern is not the Neat Ripple Pattern used for my ripple blanket. I'll post this pattern when I'm finished

Here is another project I've been working on...I need multiple things to do at one time...I wonder if I have ADD?

I'm sure you've seen these printer trays all over Pinterest, Etsy, and other blogs.


I found this printer tray about 2 weeks ago while antique-ing one afternoon after work. (I like to check out the antique shops for mid-century furniture, Cathrineholm kitchenware, and old cameras).


It needs a lot of work before I paint it turquoise and add the hooks. I'll post about this project later. I really need to get focused and finish something...hehe.

Have a great week!

Sunday, November 25, 2012

Pinterest Project


This weekend I decided to put Pinterest to good use. I chose a project from my To Do List board.

I've seen the tile coasters all over Pinterest and blogland and I love them. I sent Michael to Lowes to buy the tiles. Then Ireland and I spent part of the day Saturday working on these.


I used a mix of materials for mine. Ireland used thick scrapbook paper for her coasters, the blue and red multi-flowery ones. I used a Puffs tissue box. I couldn't find the right pattern in the box of scrapbook paper so I decided to look around the house to see what I could find. 


Most of the tutorials online use thin paper, but I really like the design of the Puffs box.


I really love the orange coaster with the cloud. It's an American Spirit cigarette ad found in a magazine. See...you can use anything. 


So this tutorial is to describe my experience with thicker materials and materials found around the house...anything other than scrapbook paper.

Materials

4 inch ceramic tiles (16 cents each)
Mod Podge (gloss)
sponge brushes
any paper material 
spray to seal (I haven't sprayed mine yet) Michael told me he already has something I can use.

When using thicker paper use a thicker base coat of Mod Podge. You won't have to worry about bubbles. If you put a light coat of Mod Podge on the tile, it won't hold thicker paper. 

Cut your paper to the desired size. I used a paper cutter that had measurements...I cut my squares to measure about 3.75 inches so it wouldn't completely cover the tile. I wanted to leave the edges to create a border.


Place the paper on the tile and press in place for a few seconds. Make sure the edges are down...thicker paper tends to come up around the edges.


I then put a thin layer of Mod Podge on top and waited about 15 minutes for it to dry. I put a total of 5 thin coats on. Use straight strokes from top edge to bottom of the tile. These brush strokes can be seen after drying so make sure you don't glob the Mod Podge.


This striped coaster is going to be a set for Michael's sister. I don't think she reads this blog...so maybe she'll be surprised.

I know the photo quality is not the best...sorry about that. All of the photos were taken with my phone. I couldn't find my Nikon charger. 

This is a really fast and easy project. It's neat to re-purpose all kinds of things found around the house.

Today I'm weaving ends on my ripple and patchwork blankets. 


I hope you all have a great week:)