Showing posts with label project. Show all posts

Monday, July 20, 2015

DIY Dining Table

I know I haven't been around lately. I am really behind on my blogging and blog reading. DIY projects have consumed me. I've crocheted some, but not a lot. I do have a couple completed projects, but I can't share just yet. Today I'm sharing a DIY project that Michael, Ireland and I finished on Saturday.

A dining table


We have a large empty space in the living area and I thought a table would be perfect.


I found something I liked on Pinterest and went from there. Michael works with a guy that has a saw mill, so we got the wood from him. Thursday, Michael came home with several 7' long pine boards that are about 7-8" wide.


About a week ago I ordered raw steel hairpin legs from hairpinlegs.com and Michael went to Lowes and bought several 2x4s, sandpaper and #10 size screws. 

Friday morning Michael built the frame using the 2x4s and I went to Lowes to get clear coat for the legs. I scrubbed the raw steel legs and sprayed them with a matte clear coat to protect them from rusting. While I worked on the legs, Michael placed the top boards upside down and screwed the frame to the boards. About 10pm we started sanding and by 11pm we were ready to put a coat of Minwax Spar Poly on the table top. I didn't get regular Minwax Poly because Spar Poly is better for use with dining tables to prevent water rings and food from staining the wood. Basically it seals better and is durable. The regular poly is for furniture like end tables, coffee tables, etc.


We finished the first coat of poly by midnight. That's why my photos are so bad.


Saturday morning we flipped the top over and screwed the legs on... and voila!


It's no where near perfect, but that's why I like it so much.  I love these legs (and really anything mid century modern).

Finished measurements:
78" in length
36" in width
2.5" thickness or depth

Materials:
Wood for the top (we used five 7-8" boards)
2x4s for the frame
#10 screws (2" in length since our top with frame measured 2.5")
sandpaper
four 28" hairpin legs (3 prong) 28" is standard table height
MinWax Spar Poly
Matte clear coat interior/exterior (to coat legs)

Tools used:
green scrubbing pads (to scrub the legs)
sander
sandpaper (various grit)
saw (we used Miter saw)
Drill
and a tape measure of course

We still need to sand and put one more coat of poly on the top. We are planning on buying three Eames chairs for one side of the table and making a bench with hairpin legs for the other side.

I'm hoping my next post will be about a crochet project that I haven't been able to share yet. Today I'll ask permission and see how long I need to wait. I'm sooo excited to share it with you, but I just have to be patient.

Have a great week!

Friday, September 13, 2013

Purple Haze Bag and a Colorful Basket

Here's another bag for the craft fair


This one is made with a round bottom


Homespun yarn doubled...unfortunately with 2 different dye lots as you can tell. Oh well;)

A really fast project

Here is the colorful basket


I'm still working on the stripey bag...maybe I'll finish it this weekend.


Wednesday, August 21, 2013

My Favorite Basket... So Far


I made this basket last night sitting in front of the tv. I think it's my favorite one yet. It's another chunky crochet basket. The color is perfect. 

I used Lion Brand Thick and Quick in Oatmeal. It took every bit of 2 skeins with an N hook. The size is a larger (7 inches in height and 10 inches in diameter) since I used a larger hook. This particular color of yarn seems to be thicker than other colors of the same brand. 

I think I'll make 2 or 3 more just like this for the craft fair.

Friday, August 16, 2013

Chunky Crocheted Tote

Here's my latest project


I am trying to make a bunch of quick and easy items for an upcoming craft fair. I plan to make several of these in different colors.

And here's my little Ellie kitty watching me take the pics


Tomorrow I'll post the pattern with more photos

Good night:)

Sunday, January 6, 2013

Smashing

Here lately I've not been in a crocheting mood. I've been smashing this weekend.


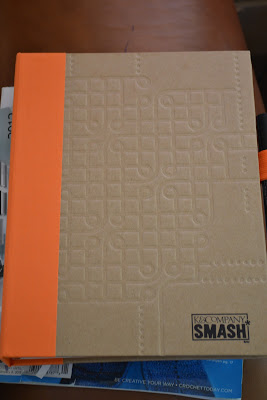
I thought I would share some of my smash book pages. I am using part of this book as design pages for the new house. Each room gets a page. Most of the things on the pages are found at IKEA. Some are from mid-century furniture.com.

The page below includes the things we are going to buy for our workspace/ playroom/ craft room in the new house. Ireland and I will be sharing this space. We plan on making a trip to IKEA in a couple of weeks.


Currently, I'm working on the pages for the sun room and master bedroom. 

The pages below are about my recent crafty projects.


I think I'll crochet a little this afternoon. I'm trying to finish Ireland's scarf made from the alpaca we bought at the alpaca farm.

Still no progress on the patchwork. I've crocheted 2 squares in the past week so I thought I would wait a few days before taking more photos...when I have more to show.

I'll probably post less over the next 2-3 weeks, since we are needing to start packing everything. I'm in the mood to move...chomping at the bit to get a date. (There was a major issue with the appraisal this time...the house was classified as an underground or passive solar house...making it impossible to find comparables)


It does not look underground to me. Passive solar maybe? There are 2 earth berm rooms, so that has been the issue. Absolutely nothing has went smooth with this house. A second appraisal had to be done, since the first one became a problem. We have been reassured that this won't be a problem now...we will see;) I'm at the point where I'll have to see it in writing to believe it. I am open to start looking for another house...it's just so stinkin hard to find land right now. We really wanted this house for all of the land.

Now they are telling us closing may be at the end of this month...so less blogging and more packing and getting ready.

Have a great rest of the weekend and upcoming week:)


Saturday, December 29, 2012

The Jewelry Display...At Last

The jewelry display is pretty much done...


I need to add more eyelet hooks so I can finish adding earrings. This tray is not large enough for all of my jewelry, so I guess I'll have to find another tray and make another display to go with this one. 


I added the hooks to the sides for necklaces...I just need to add a few more (and the necklaces). I was too impatient to do that before this post;)


I'm not sure if I want to add hooks to the bottom. I think I'll just save that for the next display.


Here's how I made this thing

It began like this...


Michael sprayed a coat of primer, then used this paint... two cans


between coats


 I then added the hooks and eyelet hooks found at Lowes. To get the hole started, I used a sharp extra pointy knife, then just used my fingers to screw them in. It will make your fingers so sore, so I had to do a few each day for several days.


I'm soooo glad it's done. I'll think I'll go antique-ing next week to find another tray:)
Hope you all have a great weekend

Saturday, December 15, 2012

Tuesday (Saturday) Tallies

I haven't made any progress on my patchwork blanket, but I have added a few rows to my chevron scarf


I've decided to add as many colors as I can...as random as possible. No color rules...just taupe thrown in every two or three color changes. A beautiful scarf from LazyTcrochet inspired my choice of taupe. I'm using my own pattern for this one.


I finished prepping the printer tray. I've been so busy with work and the house stuff so Michael took this project over (even he must be getting tired of waiting for me to make progress on all of these projects)...haha


He primed and used a whole can of spray paint while I worked a few hours last weekend.


It still needs a couple more coats of paint...and I'm out of course. So this project is on hold until I can get more turquoise paint.


I get so frustrated because I can't seem to finish anything. With the house buying and work, I just can't seem to find the time.

This weekend I'm working on the chevron scarf and patchwork, and smashing, and cleaning, and packing...maybe;)

Edit:  As of today (Sunday) I have another can of paint...so this project is back on again. Wait...It's raining here, but I am determined to finish today. We'll see;)

Sunday, November 25, 2012

Pinterest Project


This weekend I decided to put Pinterest to good use. I chose a project from my To Do List board.

I've seen the tile coasters all over Pinterest and blogland and I love them. I sent Michael to Lowes to buy the tiles. Then Ireland and I spent part of the day Saturday working on these.


I used a mix of materials for mine. Ireland used thick scrapbook paper for her coasters, the blue and red multi-flowery ones. I used a Puffs tissue box. I couldn't find the right pattern in the box of scrapbook paper so I decided to look around the house to see what I could find. 


Most of the tutorials online use thin paper, but I really like the design of the Puffs box.


I really love the orange coaster with the cloud. It's an American Spirit cigarette ad found in a magazine. See...you can use anything. 


So this tutorial is to describe my experience with thicker materials and materials found around the house...anything other than scrapbook paper.

Materials

4 inch ceramic tiles (16 cents each)
Mod Podge (gloss)
sponge brushes
any paper material 
spray to seal (I haven't sprayed mine yet) Michael told me he already has something I can use.

When using thicker paper use a thicker base coat of Mod Podge. You won't have to worry about bubbles. If you put a light coat of Mod Podge on the tile, it won't hold thicker paper. 

Cut your paper to the desired size. I used a paper cutter that had measurements...I cut my squares to measure about 3.75 inches so it wouldn't completely cover the tile. I wanted to leave the edges to create a border.


Place the paper on the tile and press in place for a few seconds. Make sure the edges are down...thicker paper tends to come up around the edges.


I then put a thin layer of Mod Podge on top and waited about 15 minutes for it to dry. I put a total of 5 thin coats on. Use straight strokes from top edge to bottom of the tile. These brush strokes can be seen after drying so make sure you don't glob the Mod Podge.


This striped coaster is going to be a set for Michael's sister. I don't think she reads this blog...so maybe she'll be surprised.

I know the photo quality is not the best...sorry about that. All of the photos were taken with my phone. I couldn't find my Nikon charger. 

This is a really fast and easy project. It's neat to re-purpose all kinds of things found around the house.

Today I'm weaving ends on my ripple and patchwork blankets. 


I hope you all have a great week:)

Tuesday, November 20, 2012

Tuesday Tallies

I missed last week's One A Day Tuesday Tallies post... I came home after dark and didn't take a picture of my progress on the patchwork granny. Today I came home after dark again. I took a photo anyway


I hate taking photos with the flash and this one is just horrible. I didn't want to miss this week's Tuesday Tallies, so a bad photo is better than no photo. I haven't made a whole lot of progress this week. I think I did manage one a day...so that's ok.

Last night Ireland started gymnastics, so I thought I would share a couple more bad photos. Next Monday I'll take a better camera with a lens so I can get some better shots.


Ireland had a great time...and I did too:D


She was so tired when we came home and slept like a baby last night. I love it...hehe

I know we will definitely be going back next Monday.

I need to go link up over at Gingerbread Girl

Have a great week!


Saturday, November 17, 2012

Lazy Day

I love to be lazy on the weekends. I have to force myself to clean and be productive on my days off. This is what we're doing...


We decided to break out the instant camera and play around with it. Ireland loves it, but the film is so expensive...I don't let her go wild with it.


I love instant gratification and this camera is pretty cool. I just hate the price of the film. We played around with it for a little while taking pictures of my blankets and each other.

Smashing is another reason I bought the camera. I'm loving these books. I have two and they are so much fun. 


I like to introduce Ireland to new things and she is learning to write her name and other words. I thought journaling would be a good thing to do with her. She always tries to crochet and gets frustrated because she just can't get it...yet;)

So junk journals or smashbooks are perfect for us to do together. She brings artwork home everyday and I decided to show her how to make journal pages with her drawings. 


Her journal is homemade, but she wants one like mine...only because it comes with a pen and glue


I think I'll spend the rest of the day working on this page of us being goofy.

I may do a row or two on my ripple...or a couple of squares for the patchwork


Have a great weekend!

Oh yeah...I have a little giveaway to get ready for, so I'm finishing up on that too. Come back soon to see what you can win:D